So where did I leave off with this blog, anyway? Oh, yes! The dog portrait!
It's finished and in the frame shop right now, but let me show you how beautifully it turned out!
"Peppy and Wickham"
 |
| www.etsy.com/listing/199560106/pomeranian-fine-art-print |
One of my endeavors this month has been the refurbishing (if I wanted to be trendy, I'd call it "upcycling") of various ugly pieces of vintage plastic home decorative items.
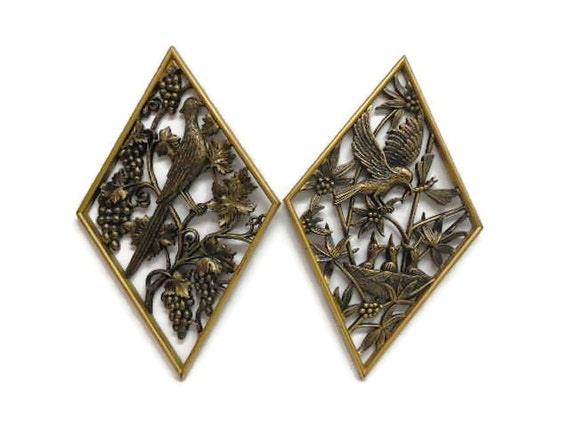
Generally speaking I like ugly, but there's "fun ugly" and there's just plain dreary. I'm referring to items in the latter category. Specifically, a set of Burwood bird wall plaques I've had on sale forever without so much as a nibble, a hideous fake wood-grain plastic wastebasket I found at a garage sale, and a scary-grubby file box/small chest by some company I've never heard of before called Max Klein.
 |
| These Syroco-type wall plaques have been driving me nuts with their dark, "bronze" finish. |
 | ||
| I actually bought this knowing it was ugly, but with the idea of re-doing it. |
Well, some fool with a can of spray paint decided to rush in where angels and serious restorers fear to tread, and I must confess it was I. If the Antiques Roadshow folks don't like it, they can lump it!
First I scrounged around and found a can of a deep burgundy red paint and "had at" the bird plaques. About 3-4 coats covered them nicely. But then I had the thought that it might be fun to dab them with some shiny metallic ink for highlights, so I got out a little colored ink pad ("Artnic" 94 Bronze)
and lightly applied it here and there to give the appearance of sunshine. Finally I finished these off with a couple of coats of clear acrylic sealer spray.
 |
| The coppery-bronze highlights add a bit of dimension. Plus it was just fun to do! |
But after I was happy with the general background, I rummaged around and found a bottle of half dried up gold acrylic paint and proceeded to sponge it on the raised "relief" designs. I love how it turned out:
The file box covered more quickly and easily than the dark brown wastebasket. From start to finish (well, as finished as I am at this moment) took only one warm evening. Notice I covered the hinges and clasp with masking tape before spraying. I'll have to go back and retouch some small missed spots tomorrow, and give it the clear finishing coat to seal it.
I'd used up my gold paint on the wastebasket, but fortunately I had another of those little stamping inkpads ("Artnic" 91 Gold) and it worked terrifically well!
 |
| Before the gold... |
 | |
| Partway through... |
 |
| And here's the (nearly) finished result! I have a few smudges to touch up, and then the clear acrylic sealer to spray on. |
I'm quite pleased with the resultant "Hollywood Regency" appearance. I'm planning to store the granddaughters' wooden blocks in it. It'll be both decorative and sturdy enough for the job. And, if it should get banged up, it won't be a big deal.
This spray painting is fun! I want to do more.


No comments :
Post a Comment