Let us put by some hour of every day for holy things...

I will not doubt, though all my ships at sea
Come drifting home with broken masts and sails.
I will believe the Hand which never fails,
From seeming evil, worketh good for me.
And though I weep because those sails are tattered,
Still will I cry, while my best hopes lie shattered:
I trust in Thee.
--Ann Kimmel

Although the fig tree shall not blossom, neither shall fruit be in the vines, the labor of the olive shall fail and the fields shall yield no meat, the flock shall be cut off from the fold and there shall be no herd in the stalls, yet I will rejoice in the Lord, I will joy in the God of my salvation. Habakkuk 3:17-18

Monday, January 24, 2022

Upcycle Project: Refurbished Metal Tins

Quick share here today of a project I've been playing around with for a bit: upcycling some rather bland (ugly!) used tins. Some were tea tins I acquired for a quarter apiece at a garage sale just for this purpose, one had been a gift tin originally containing a wristwatch, one I grabbed at Goodwill because of its appealing shape, and one was an actual vintage Daher tin that was sort of nice, but I craved an improvement. (Well, MY idea of an improvement.) Without further ado, here's the first one. Daher "Fascination Face Powder" tin. Yes, it's vintage, but I see lots of these available and I don't think the Antiques Roadshow police are going to come after me for defacing this one. And I literally mean "defacing"! Here's what it looked like originally (not my photo, but one I plucked at random from the internet).
Nothing wrong with this tin, per se, but I had some vintage Meyercord decals I wanted to play with. Here's my "Must Love Dogs" version:
I had a little trouble with the old decal cracking and splitting; hence the spaniel's slightly mutant appearance, but with the addition of some fine iridescent glitter and my Posca paint pens, I minimized what I could and I'm relatively pleased with the result. I've since learned that if one applies a coat or two of clear spray paint on old decals, they're less likely to disintegrate when soaked in water for application. It's not a guarantee, but it does help. Here's an example: This tin was the dreary Fossil (?) watch tin. I spray-painted the lid (bit tricky, but you can manage it if you cover the bottom part surfaces with paper first) to cover up all the writing and logo stuff. Then I took my vintage deer decal, treated with two layers of clear spray paint, and applied it. It still split slightly, despite my efforts, but I'm pretending that just adds faux-vintage patina to my project. I also used a coat of spray adhesive and carefully sprinkled fine iridescent glitter to further disguise the flaw. Not a true fix, but I can live with it.
A gift of new vintage-design decals set me off on the tea canister project. These are really quite delightful! I understand they were ordered from Etsy, but I'm afraid I don't know which seller. First, I spray-painted the tins to give them pretty pastel backgrounds. The new decals went on like a charm! Here are some photos of my "new vintage" poodle tins:

Wednesday, January 5, 2022

Whole Lot of Projects Going On

It's about three weeks since I put my Etsy shop in mothballs, and I'm starting to feel my creative juices flowing again. It's amazing what having free time can do. Anyway, no long intro--I've been out of the loop with this blog for a long time, so I'm just going to launch in. About a year ago, I saw a youtube video about making your sewing scraps into useable pieces of fabric. Kind of nice and mindless--no pattern needed, no plan--just sort of crazy quilting little pieces of fabric together. I'm always loathe to throw out bits of vintage fabric, and I'm not especially skilled in my sewing, so this idea was appealing. From time to time, when I was in the mood to make something but hadn't the energy to tackle an actual project, I would pull out some scraps and go to it. A couple of days ago I decided I wanted to try actually making something with the results. Wasn't sure what; just knew I didn't want to make yet another tote bag. I settled on a reversible apron. I have made a number of these over the years because I wear them almost every day, and I know what style and features I want. And I'm a cheapskate! Don't want to fork out the money to buy those cute frilly mid-century style aprons I see for sale, although they are quite fun. I like a cheery-looking apron, simply styled, and I like them double-sided so I can flip them over if one side gets a bit mucked up before I'm ready to do the laundry. So, anyway,I pulled out one of an "old faithful", traced around it on my crazy-quilt cloth, and in very short order, voila!
It has a fun pocket, too. Nice to have found a good use for this little snippet of butterfly print fabric:
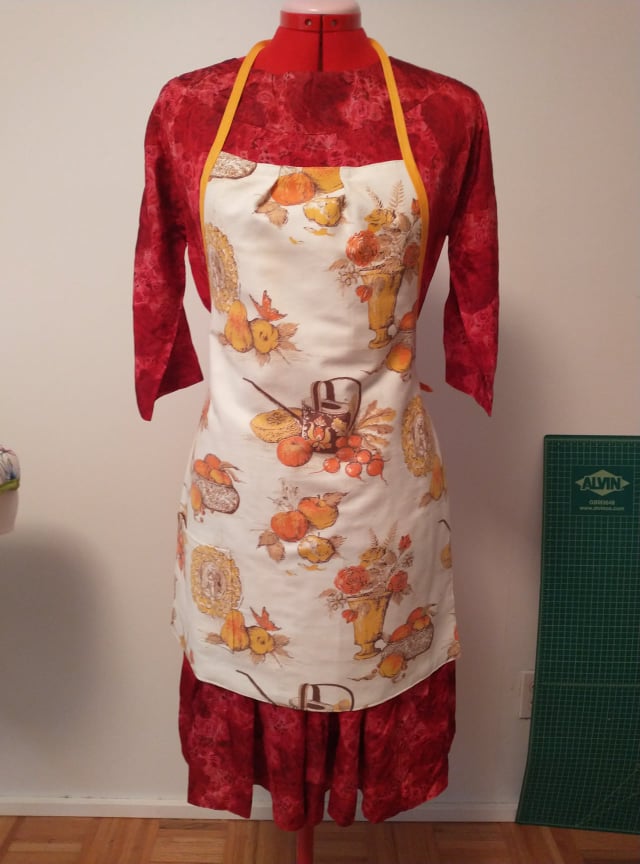
For the opposite side of the apron, I took the plunge and cut up a small hemmed panel of vintage kitchen curtain fabric I've had in my stash for a long time. Had to pluck up my nerve a bit, but I did it! Here's the apron's reverse pattern:
And I have to show off the pocket--I matched it up so it's almost invisible!
Now, in case you're wondering about the red dress on the dummy, it's a sixties full-skirted beauty I picked up at a garage sale this past summer for $4. It just needs a bit of replacement stitching at on the zipper and is waiting its turn in my mending queue. Pretty thing, huh?
Finally, to finish up, I stitched up some new hotpads. (My old ones are in pretty disreputable condition.) Here they are, front and back. Not fancy, but a satisfying project all the same.
Be back soon to show you more projects. Be sure to head over to the facebook page for daily vintage and vintage-inspired posts.

Monday, June 8, 2020

Gasp! She Diversifies!

How doth the little busy bee
Improve each shining hour
And gather honey all the day
From every opening flower?
~Isaac Watts (1674-1748)


Quick post today: I want to show you that I can actually make something besides a poodle cozy. It's not easy, mind you. No matter what my intentions when I begin a cozy, it generally morphs into a poodle before I'm very far into the process.

But recently, I branched out! Some gorgeous bright yellow yarn was beckoning, and after failing miserably endeavoring to make a chick, I cast about for another idea. Voila! A bee! 
I'll admit this was a second attempt. I got as far as this and was stymied, so the little fellow (no, little gal, now that I think about it from a scientific standpoint) sat perched on the shelf above my computer while I tried to figure out how to proceed, especially with the limited supplies I had on hand. She just didn't look complete. 

This state of affairs went on for a few weeks, until I had an epiphany over the weekend. Some yellow tulle netting, glitter, and sequins; some multi-colored tiny pompoms and chenille stems; my not-so-trusty glue gun... Suddenly she came into her own! I'm absolutely in love with her, though she is proving to be a challenge to photograph. Either the eyes have too much glare or the wings don't show up to advantage. But here she is: 


Let me know what you think. 

And while we're on the subject of bees, I hope you'll consider making a simple bee watering station to put out in your yard or on your porch. Honeybees are in a serious decline, and they need all the help we can give them. You can find lots of articles and videos online if you need inspiration, but they can be really simple--some pebbles and rocks in a dish of water that you replenish regularly on dry days. Your local bees will appreciate it; your butterflies, too! You'll be surprised at how often it's visited. It makes a neat nature project for kids, too. 


Monday, June 1, 2020

A Whole Lot of Poodling Going On

If' I'm ever to have the fabled "15 minutes of fame" I venture to guess it will be because of my poodle toilet tissue cozies, which are really the only thing I make that might be worthy of acclaim. I joke about "My nefarious mission: Repopulating the world wit kitschy, tacky poodle tissue cozies, one bathroom at a time!" But it's only partly a joke. I really think everyone benefits from whimsy, and these zany canines are my contribution to that happy sense of absurdity we need so much in the stress-filled times in which we live. My sewing skills are so-so (ignore the pun, I'm being truthful here!), I love to knit but don't do anything terribly ambitious or complicated. But I do make a mean toilet paper cozy, and I'm not too bashful to say so. 

The past few weeks I've been experimenting with some new designs. 

Actually, I'm always experimenting, and in the past 8 or 9 years since I began making these, there's been quite a few changes and improvements I've implemented.

Here are some of the earliest examples of my work; they seem pretty crude to my eye now, but even then, folks seemed to like them and I sold quite a few. 


My photography wasn't up to much in those days, either, looking back.

But over the years I've done a lot of fine tuning and I'm quite pleased with how much they've improved. 

Several weeks ago I was approached to make a custom order poodle in the style of the vintage spaghetti-ware figurines that were so popular in the 1950's and 1960's. Like this: 


This was a delightful project, though coming up with the eyeglasses took a good deal of trial and error, but eventually I sent this charming cozy off to her happy new owner:


Several more of these bespectacled canines later, my daughter had another idea for me. She suggested I make just a poodle head cozy, not a whole body poodle. 

This also took a deal of experimenting, and I'm still in the early stages of developing it, but I'm finally feeling hopeful I'm getting it nailed to my satisfaction. Because the proportions are completely different, my usual eyes simply don't cut it, and I have had to experiment with teddy bear "safety eyes"--not that they're child-proof by the time I'm done with them, as they have to have the shanks removed so they can be glued in place. My husband obligingly saws them off for me. And the eyebrows--good grief!! Those have really had me stymied. But I think now I'm getting it. (One fan suggested I use actual false eyelashes, and I may have to give that a try. Meanwhile, I'm using to stiffened felt.)

Here is the prototype. She's definitely looking stunned. Or stoned.
Altogether, she just doesn't suit me.


My next poodle head is much more to my liking, though! Here she is: 
I've given her a larger "top knot" pompom, set her eyes further apart, and tapered the eyelashes. A larger, repositioned bow is another change I like. It seems a bigger poodle needs a bolder-looking bow with more "substance" so I used my best quality saddle-stitched grosgrain ribbon. Not sure what this type is made of, but it's definitely heftier and holds its shape better than the cheaper polyester stuff I used on the other one. Here's another view: 
This pretty poodle will be available in my shop soon! I wanted to show her off here first.


After working on my pretty peach gal (the yarn, by the way, is vintage Phentex from the 1970's, approximately--love the color!) I went back to Prototype Poodle and worked a bit on her again, trimming the goofy Carol Channing eyelashes and giving her a larger bow. It's about all I can do for her, but she does look better, I think: 
https://www.etsy.com/listing/795314942/petal-pink-crocheted-poodle-toilet-paper

Anyway, I know it's been a very long time since I've posted anything, but I wanted to share what I've been working on. And I'll have more to come soon As I say, there's been a whole lot of poodling going on around here. 

Saturday, February 8, 2020

Dog Rescue... Very OLD Dog Rescue


It's probably been two or three years ago, at least, that I bought a bag of vintage yarn, and when I got it home, I found a little surprise in it: several knitted pieces to make a little stuffed toy dog. These were rubber-banded together with a magazine clipping with both the pattern and illustration showing how it would look when assembled.


I'm not sure just how old the pattern is, but I'm guessing it dates to the mid-1960's to 1970's. I'm going by the only clue I have, which is he photo of a bubble-cut Barbie on the reverse side of the instructions:


The knitted bits also appear old, being of a slight mohair texture. I wish I knew who had made them. No doubt the child for whom the toy was intended is long since grown and probably a grandparent by now.

But anyway, early last year I got around to stuffing the pieces with wool and sewing them together. Then I propped the little fellow up on a shelf in my sewing room and ignored him until a few days ago, when I decided to get cracking and finish him, as per my 2020 new year's resolution to conquer my many partially-finished craft and sewing projects.

Here's the result:


I think he's rather sweet!

I also finished a little dress this week. I'd gotten it about half done in December, but hadn't had time or desire to deal with it since. I'm showing you the front here; the back zipper is slightly wonky but serviceable. 


I hate doing zippers! Especially lapped zippers, which I can never quite figure out, no matter how many YouTube tutorials I watch. One of these days I intend to make myself learn how to do them properly. 

So, a few more "UFO's" crossed off the list and I'm onward and upward!

Here's the complete pattern for the dog, in case you'd like to make your own: 

UFO Alert!

Yeah, it's me again, come up for air!

I know it's been a donkey's age since I've posted, and even longer since I posted with remote regularity, but at my pay rate (zilch) you take what you get! 

However, I'm feeling inspired, and think this blog may just become a "thing" again. 

That's because I've been on a roll with the projects since closing up the Etsy shop. You see, my new year's resolution was to tackle all those "UFO's" (UnFinished Objects) stacked and neglected in my sewing room and in my yarn closet. Posting my successes is my way of staying on track and and motivating me to continue.

So, as Miranda Hart would say, "On with the show!"  

Previously in my life... (Okay, it was January:)

...I figured out how to make buttonholes with my new sewing machine and finished up this very vintage (1950's?) little girl dress which I bought in its partially constructed state for a few bucks last summer:


Sweet vintage print, huh? Wonder what the lady for whom this dress was originally intended looks like today?

I also got around to mending some vintage wool "49'er" jackets (one a Pendleton, one a lookalike) which had been languishing, unwearable for months, until I took pity on them: 

...as well as, replacing the mismatched and missing buttons on this 60's/70's double-knit jacket with its delicious silver lurex threads. I shall look forward to summer when I can wear this again , open fashion, over my t-shirts:


After that I changed gears from sewing to knitting, and got this pair of socks off the needles and grafted the toes. They've been waiting about a year. So far, winter's been more wet than cold here so I probably won't need them until next year, but it felt good to free up the needles and mark another task off my list:


During the last week of January I moved from the practical to the whimsical, and forced myself to finish up some miniature faux poodle cozies. If you've read previous blog posts you know poodle cozies are rather a "thing" with me, but these are little doll-sized models, inspired by my increasingly-famous doll-collecting daughter, Madeline, of "All My Plastic Children" and "Travels with Barbie" instagram renown. I had made her one for her Barbie doll house, and she suggested I make others to sell to her serious collector friends. 

It was a very fiddly and frustrating project and I don't look forward to doing this again any time soon. It necessitated making my own teeny-tiny pompoms and using the finest of crochet hooks and, all-in-all, involved a lot of snarling and gnashing of teeth. So I'm not selling them cheap, but if you're desperate for a truly kitsch accessory for your collection, let me know. The pink one is $35 with free shipping, and the yellow and turquoise ones are priced at $30 each with free shipping. (Stop laughing!!!)


That wraps up January.

My first week in February has also been productive,  but I'll post that update later. There's an estate sale I need to hit!

Thanks for looking me up again after all this time. I appreciate it.

Now go out and accomplish something, then tell the rest of us about it!


Friday, November 8, 2019

Going for the Wall!


It's a prison break! One more week and I'm bailing out of Etsy. 

Hi, friends... Yeah, I know. This blog has been out of sight and out of mind (out of MY mind!--but what else is new?) for months now, but there is hope of it being revived. The reason is, I've decided to chuck my Etsy shop. For real, this time! Only about a week to go and then I'm "going for the wall". Hallelujah!

I decided to bail out a couple of months ago and have been listing new items madly in a last gasp to clear out the excess vintage clutter around the place. I've put the shop into sale mode and I'm boxing stuff up madly and shipping it out. It's a bit frantic right now, but the prospect of (Dare I breathe it? Gasp!) FREE TIME is beckoning to me like a oasis mirage in the middle of the Sahara and I'm dragging myself toward it with all the waning strength I can muster.

The stuff that doesn't sell will be divied out to family members and friends or donated to the local humane society thrift shop. 

And how will I spend my nobly won free time, you ask? Doing everything and anything I jolly well want to, that's what! Going with the whim of the moment. Making things again. (It's been forever, it seems.) Reading. Maybe even taking up a musical instrument. Going for lots of walks with my dear, dear dogs. Maybe even resuming this blog! I have no fixed plans. I'm getting out of the loop, and I'm going to like it! 

Lollia and Wickham, now 11 years old.


So, anyway, that's the scoop. Just wanted to let you know, and do a little last-gasp shameless promotion of the shop. Still have over 300 vintage gems to part with and I hope you'll head over and check 'em out. 

Tune in next time for what might actually be a post worth reading, for a change! And thanks for hanging in here with me.

SheerTrashRoadshow.etsy.com